Monday, 1 October 2012

Show the Classic “All Programs” Menu in the Start Menu in Windows 7

Show the Classic “All Programs” Menu in the Start Menu in Windows 7

There are a lot of new users to Windows 7 who are not happy with the new Start Menu and wish they could revert to the Classic menu. Here is how to at least get back the Classic “All Programs” Menu.
Remember the Classic Start Menu in XP where you could show the All Programs Menu? Let’s take a look at getting that back in Windows 7.
sshot-2010-07-12-[22-16-17]
Note: This trick uses a Registry hack so you’ll want to make sure you back up the Registry before making any changes.
Get All Programs Menu Back
First click on the Start Menu and type regedit into the Search box and hit Enter.

Now we need to navigate to HKEY_CURRENT_USER\Software\Microsoft\Windows\CurrentVersion\Explorer\Shell Folders. Double-click on Favorites on the right side…

Now change the Value data to the following and click OK:
C:\ProgramData\Microsoft\Windows\Start Menu\Programs

Next scroll down a bit further to HKEY_CURRENT_USER\Software\Microsoft\Windows\CurrentVersion\Explorer\User Shell Folders. Double-click on the Favorites entry.

Again we need to edit the Value data to:
C:\ProgramData\Microsoft\Windows\Start Menu\Programs

After making the changes close out of the Registry Editor and right-click on the Start Menu and select Properties.

In the Taskbar and Start Menu Properties Window click on the Start Menu tab then click on the Customize button.

Scroll down and click the box next to Favorites menu, click OK, and reboot your system.

When you come back from the Restart you will see Programs on the right side of the Start Menu and have a list of All Programs similar to that of XP.

While it’s not quite the same as the good old XP days, if you’re looking to get the All Programs Menu back, this Registry hack will do the trick without installing 3rd party software.
If you’re not comfortable making changes to the Registry, check out some 3rd party solutions which we have covered…

Show the Classic “All Programs” Menu in the Start Menu in Windows 7

Show the Classic “All Programs” Menu in the Start Menu in Windows 7

There are a lot of new users to Windows 7 who are not happy with the new Start Menu and wish they could revert to the Classic menu. Here is how to at least get back the Classic “All Programs” Menu.
Remember the Classic Start Menu in XP where you could show the All Programs Menu? Let’s take a look at getting that back in Windows 7.
sshot-2010-07-12-[22-16-17]
Note: This trick uses a Registry hack so you’ll want to make sure you back up the Registry before making any changes.
Get All Programs Menu Back
First click on the Start Menu and type regedit into the Search box and hit Enter.

Now we need to navigate to HKEY_CURRENT_USER\Software\Microsoft\Windows\CurrentVersion\Explorer\Shell Folders. Double-click on Favorites on the right side…

Now change the Value data to the following and click OK:
C:\ProgramData\Microsoft\Windows\Start Menu\Programs

Next scroll down a bit further to HKEY_CURRENT_USER\Software\Microsoft\Windows\CurrentVersion\Explorer\User Shell Folders. Double-click on the Favorites entry.

Again we need to edit the Value data to:
C:\ProgramData\Microsoft\Windows\Start Menu\Programs

After making the changes close out of the Registry Editor and right-click on the Start Menu and select Properties.

In the Taskbar and Start Menu Properties Window click on the Start Menu tab then click on the Customize button.

Scroll down and click the box next to Favorites menu, click OK, and reboot your system.

When you come back from the Restart you will see Programs on the right side of the Start Menu and have a list of All Programs similar to that of XP.

While it’s not quite the same as the good old XP days, if you’re looking to get the All Programs Menu back, this Registry hack will do the trick without installing 3rd party software.
If you’re not comfortable making changes to the Registry, check out some 3rd party solutions which we have covered…

Show the Classic “All Programs” Menu in the Start Menu in Windows 7

Show the Classic “All Programs” Menu in the Start Menu in Windows 7

There are a lot of new users to Windows 7 who are not happy with the new Start Menu and wish they could revert to the Classic menu. Here is how to at least get back the Classic “All Programs” Menu.
Remember the Classic Start Menu in XP where you could show the All Programs Menu? Let’s take a look at getting that back in Windows 7.
sshot-2010-07-12-[22-16-17]
Note: This trick uses a Registry hack so you’ll want to make sure you back up the Registry before making any changes.
Get All Programs Menu Back
First click on the Start Menu and type regedit into the Search box and hit Enter.

Now we need to navigate to HKEY_CURRENT_USER\Software\Microsoft\Windows\CurrentVersion\Explorer\Shell Folders. Double-click on Favorites on the right side…

Now change the Value data to the following and click OK:
C:\ProgramData\Microsoft\Windows\Start Menu\Programs

Next scroll down a bit further to HKEY_CURRENT_USER\Software\Microsoft\Windows\CurrentVersion\Explorer\User Shell Folders. Double-click on the Favorites entry.

Again we need to edit the Value data to:
C:\ProgramData\Microsoft\Windows\Start Menu\Programs

After making the changes close out of the Registry Editor and right-click on the Start Menu and select Properties.

In the Taskbar and Start Menu Properties Window click on the Start Menu tab then click on the Customize button.

Scroll down and click the box next to Favorites menu, click OK, and reboot your system.

When you come back from the Restart you will see Programs on the right side of the Start Menu and have a list of All Programs similar to that of XP.

While it’s not quite the same as the good old XP days, if you’re looking to get the All Programs Menu back, this Registry hack will do the trick without installing 3rd party software.
If you’re not comfortable making changes to the Registry, check out some 3rd party solutions which we have covered…

Windows XP/loss of tools menu

Windows XP/loss of tools menu 

Advetisem


Question
QUESTION: Hi mayur  I have 'lost' the System Tools menu via > START > All Programs > Accessories.
I can get to Disc Cleanup, Defrag and System Restore via other Routes but how can I get the
Tools menu back into Accessories

David

ANSWER: Hi David,

The easiest way to get this back would be to use System Restore and go back to a date when it everything worked correctly.

Check the Recycle Bin, it might be there if it was accidently deleted. Stranger things have happened.

You can re-create the shortcuts on the Start Menu. Right-click the 'Start' button, then select 'Explore'. This should open Windows Explorer to the 'Programs' folder. Open this folder and you should see all your programs that are listed on the StartMenu. Create a new folder, name it 'System Tools', then use the 'highlighted' locations of the System Tools to create new shortcuts in your new folder. Post back and let us know if you have anymore problems.

Hope this helps!
Lorry


---------- FOLLOW-UP ----------

QUESTION: Thanks for your response Lorry; I can't do a Restore as I've also lost all restore points and there's nothing relevant in Recycle Bin. However I've found that the needed Shortcuts are in the > Documents and Settings > All Users > Start  Menu > Programs > Accessories > System Tools Folder but are not showing on > START > All Programs display for some reason - The only stuff that's showing there is in the same sequence but starting in > Documents and Settings > David
I'll have to put relevant shortcuts into David unless I can find a way of displaying All Users...Programs via START > All Programs.
Thanks for your help,
David

Get the answer below
Sponsored Links
Mobile Ads Redefined#2 Largest Mobile Ad Network. $10+ CPM's, Weekly Payments.Airpush.com

Secret Way to Rename the Start Button

Secret Way to Rename the Start Button

SHARE:
Adjust text size:

It all begins with the start button. Maybe one of the most representative symbols of the Windows operating system, the start button has been present on our taskbars since Windows 95 and still hangs there along with the new Windows Vista.

Although its shape may have changed over the years, one thing remained the same: its display name, START. This is a remarkable success for the brand continuity and for Windows marketing scheme but we, the end users, may have gotten bored with it.

Nowadays, everything tends to become customizable, from a simple cell phone to an expensive car. If that's possible, why wouldn't there be available a method for renaming the start button?

By default, there is not a single option available in Windows to permit changing the name of the start button but there are always people who think and act to achieve what they want.


How it's done

There are two steps to follow in order to obtain what we want:

1. Editing the explorer.exe
2. Tweaking the registry to accept the changes.


First step

Explorer.exe is found in Windows folder and must be edited enable the renaming of the start button. Because we are dealing with a binary file, we need to use a file editor. I successfully edited the file using the Resource Hacker application. It is a free program available for download from Softpedia. Once you have downloaded it, extract all the data from the archive and run ResHacker. Now open the explorer.exe.

In the left, you can see an information tree. Expand String table > 37 or 38 (37 string is for the normal XP layout and 38 one is for the classic layout). You just select the one suitable for your Windows and then select 1033. In the right, line 578 display Start between quotes. Rename it with the desired name and then click the Compile Script button which is placed above.

It's time to save the new version of the explorer.exe. Click save as from the file menu and save it with a different name. I chose softpedia.exe.
Review imageReview image


Step two

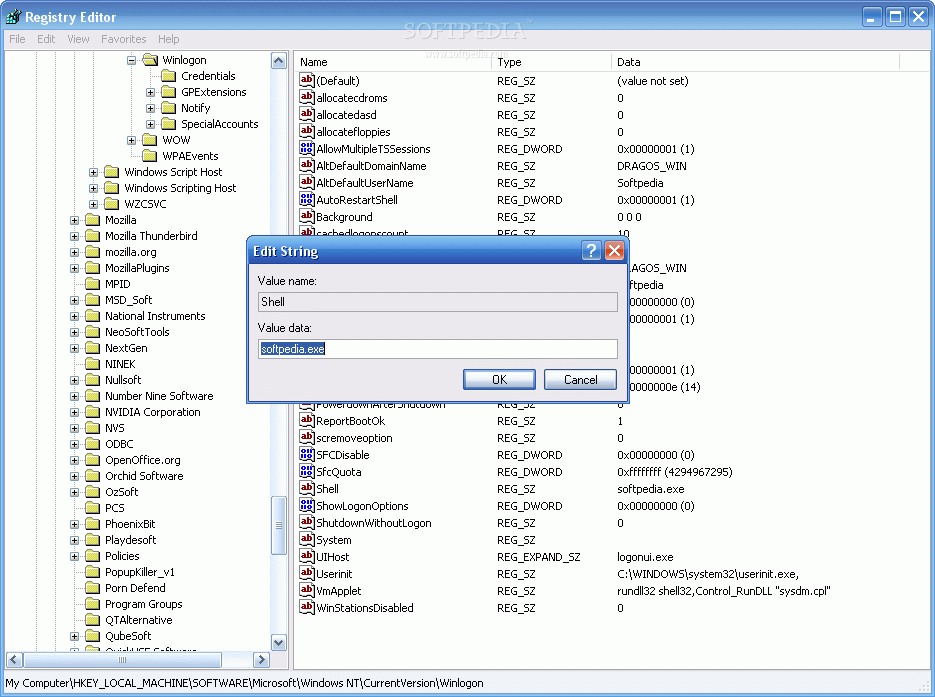
Go to start > Run and type Regedit to open the registry editor. Look for this path:

HKEY_LOCAL_MACHINE>SOFTWARE>Microsoft>Windows NT>CurrentVersion>Winlogon

In the right, find the "Shell" entry. Double click on it and replace explorer.exe with softpedia.exe (or whatever you renamed the edited file).

Close the registry editor and Log Off or Restart your computer. After Windows XP boots, the new start button will have the name you have chosen.
Review imageReview image


My tip is not to use long names because the start button will have to adapt in order to be able to show such names and its shape will be elongated and might not look too pleasant.

Schedule or Auto shutdown PC at specified time – Freeware for Windows Linux or MAC

Schedule or Auto shutdown PC at specified time – Freeware for Windows Linux or MAC


Shutdown windows xp automatically
Sometimes its always healthy to shutdown your pc if you are not using it. I mean, suppose you are downloading a file that will be completed at an estimated time of say 1 hour. You can avoid sitting in front of the monitor till the download is complete. just use the below freeware software to shutdown the computer automatically after a specific amount of time.

Auto Shutdown for Windows software (freeware) – automatic shutdown
Automatically shutdown windows xp after certain time

Usage of Auto Shutdown:
1. Set the time.
2. Set the action to be taken.
a.    Shutdown means that the computer will be turned off (after logging off, if needed). Force means that the running applications (if any) will be forced to close themselves). This can be dangerous, is some cases you may loose your data, unsaved documents.
b.    Remind me about means that, when the time will come, a message box will be shown with your message (e.g. “Eggs are ready!”, or “the movie has began!”).
3. If you want, minimize the program (the “Auto Shutdown” program dialog).
4. That’s it. When the time will come, auto shutdown will do the specified job.
Of course, if you close the dialog (the “Auto Shutdown” program), then nothing will happen. Auto Shutdown must be running to work.
Download Auto shutdown for windows
Download Auto Shutdown Genius — For Linux.
Auto Shutdown Firefox Extension: For MAC/Linux or Windows
Autoshutdown Firefox Plugin

Features:
* Executing user scripts after all downloads are finished or computer is idle for specific time
* Play sound after each/All downloads are finished
* Restore Firefox from last session
* Customizable shutdown/idle scripts
* Supporting DownThemAll

For Safe Computing Disable CD/DVD or USB Autorun in windows


For Safe Computing Disable CD/DVD or USB Autorun in windows


When ever you plug a usb device to the system or insert a cd/dvd disk, The windows Autorun Run utility runs and displays certain options like Open files to view, Play, Do nothing etc.Disable Cd Usb autorun in windows xp for security purpose Although this a good utility provided by windows xp operating system, It is sometimes very dangerous too. When A virus infected Usb drive or Cd is plugged into the system, the virus gets a chance to attack you Operating system, by running automatically when you plug your device in. So, for this safety purpose, we need to Disable this Autorun feature in windows XP.
Follow the below steps and ensure your systems safety.

1) Click Start –> Run and type  GPEDIT.MSC  –  This opens Group Policy editor window.
2) On the left side –> expand  Computer Configuration–> Administrative Templates–> System.
3)  Locate the entry for Turn autoplay off on the right side.
4) Double click it and select “Enabled”
For any further assistance to Disable Cd Autorun view the sample screen shot below.
Disable turnoff windows cd Autorun